

THE OUTBOARD FLUSHING GUIDE

Why outboard engine flushing matters.

Salt gets the attention. Water flow, flushing time and what else comes home inside your engine matter just as much.

Learn how to give every engine a proper freshwater flush—and make the routine easier to follow after every trip.

Understand the water flow Find your flushing setup
Corroded outboard cooling-system component with heavy white deposits on its spring and housing
A close look at corrosion and deposits on an outboard cooling-system component. Flushing is preventive care; it cannot restore damaged metal.

WHAT YOU CANNOT SEE FROM THE DOCK

A clean cowling does not mean a clean cooling system.

Your outboard draws in the water you boat in to manage engine temperature. Rinsing the outside and flushing the internal water passages do different jobs. A good maintenance routine includes both.

Shown: twin Yamaha outboards with a piling-mounted Controller, Cradle and Suncover.
A consistent return-to-dock routine starts with accessible connections.

01

THE MAIN CONCERN

Salt & corrosion

Saltwater left inside the cooling system exposes internal surfaces to a corrosive environment. Deposits can also restrict the small passages that cooling water needs to travel through.

Flushing with clean fresh water helps remove salt residue after use. It is a routine to maintain—not a cure for existing corrosion.

02

SALT IS NOT ALONE

Restricted cooling passages

Sand, silt, mud and other material can enter with the cooling water. Accumulation can interfere with circulation, so freshwater boating is not a reason to skip engine care.

Persistent weak flow, overheating or visible damage calls for inspection. More time on a hose is not a substitute for finding the problem.

03

METHOD + FLOW + TIME

A complete routine

A proper flush brings three things together: the correct connection and engine state, an adequate clean-water supply, and the full duration specified for your engine.

Fast hose hookup is useful. Stopping the water early or supplying too little water can leave the maintenance job incomplete.

YOU MAY BE ABLE TO PUT THE MUFFS AWAY

An approved flush port can replace muffs for routine flushing.

Many outboards have a dedicated freshwater flush connection. When the manufacturer approves that method for your engine, you can connect there and perform the routine flush without fitting muffs around the lower-unit water intakes.

A hand connecting a hose fitting at the flush port on a Yamaha outboard
A Flushmaster Quick Connect at a Yamaha flush port. Fitment and the engine’s flushing instructions still apply.

CONNECT WHERE THE ENGINE WAS DESIGNED TO FLUSH

Flush the engine. Leave the engine off.

A flush port provides a convenient hose connection to the engine’s flushing path. A compatible Quick Connect simplifies hookup; a Reroute moves that hookup within reach.

A flushing connection is not automatically a water supply for a running engine. Yamaha instructs owners to keep the engine off when using its built-in flush port. Running on an unsuitable connection can damage the engine or water pump.

Use the exact engine model’s manual to confirm engine state, position, water supply and duration. Read Yamaha’s engine-running precautions.

See brand-specific connection videos

THREE METHODS. DIFFERENT REQUIREMENTS.

Flush port, flush muffs or flush bag?

The right choice comes from your engine’s manual and cooling-water inlet design. These illustrations show connection locations, not a universal installation procedure.

CONVENIENT HOSE ACCESS

Built-in flush port

Connection: the designated hose fitting on the engine.

Best use: routine freshwater flushing where approved. It can eliminate the need to install muffs for that task.

Engine state: commonly OFF. Follow the model’s instructions; never assume the port can cool a running engine.

LOWER-UNIT CONNECTION

Flush muffs

Connection: an approved adapter over the lower-unit water intakes.

Best use: when specified by the manual, including some procedures that require the engine to run.

Important: muffs must suit the inlet arrangement and maintain adequate water supply. Some dual-inlet engines need an additional adapter.

IMMERSION METHOD

Flush bag or tank

Connection: a water-filled container around the lower unit, used as the manufacturer directs.

Best use: models or approved procedures suited to this method.

Important: water level, replenishment and operating instructions are model-specific. Never start an engine without its required cooling-water supply.

GIVE EACH ENGINE THE WATER IT NEEDS

One hose. Several engines. A shared supply.

A splitter adds outlets; it does not create extra water. Running several engines’ flushing connections at once asks one source to feed every open branch. That can reduce the flow available to each engine compared with supplying it alone.

One source shared across three open branches

SIMULTANEOUS FLUSHING

Several outlets open

Each open branch draws from the same source. Opening another branch can change the water available to the others. More connections, a long hose, kinks or a weak dock supply can make the problem worse.

Do not assume a brief stream of water proves the full cooling system received the required flush.

One active branch; the next engines wait their turn

SEQUENTIAL FLUSHING

One engine at a time

Keeping only one engine’s flushing path open avoids dividing that source among multiple engines. Complete its required duration, then supply the next engine.

A Flushmaster Controller automates this sequence. It does not boost pressure or fix a restricted hose, so the source must still meet the engine’s requirements.

The diagrams illustrate shared versus sequential supply; they do not represent measured flow rates. Engine requirements come first: Yamaha’s water-supply guidance · Mercury’s reminder to follow the model’s manual.

FASTER HOOKUP. THE FULL FLUSH.

How long should you flush an outboard?

Give each engine the full flushing time specified for its model and method. Cutting a required cycle short can leave an insufficient flush. There is no single duration that overrides every engine manual.

15 min

PUBLISHED GENERAL GUIDANCE

Yamaha maintenance guidance

Yamaha’s corrosion-prevention guide recommends a 15-minute freshwater flush. It describes the built-in attachment with the engine not running.

10 min

PUBLISHED GENERAL GUIDANCE

Mercury Quick Tip

Mercury’s general flushing guide describes a 10-minute flush at the flush connector without starting the engine. Individual model manuals can specify a different procedure or time.

Plan the time for your engines

Enter the duration from your manual. This estimates sequential water-on time when every engine needs the same duration; hookup time is extra. If requirements differ, add each engine’s required time separately.

The starting value of 15 minutes is an example, not a universal setting.

30 minutes total

Examples from manufacturer guidance: Yamaha corrosion prevention · Mercury Quick Tip. Use your model’s current owner’s manual if its procedure differs.

SALT IS THE MAIN REASON. NOT THE ONLY REASON.

Freshwater boating still brings things home.

Lakes and rivers can carry sediment, organic material, minerals and pollutants. “Fresh water” in the lake is not the same as clean water from a suitable flushing supply.

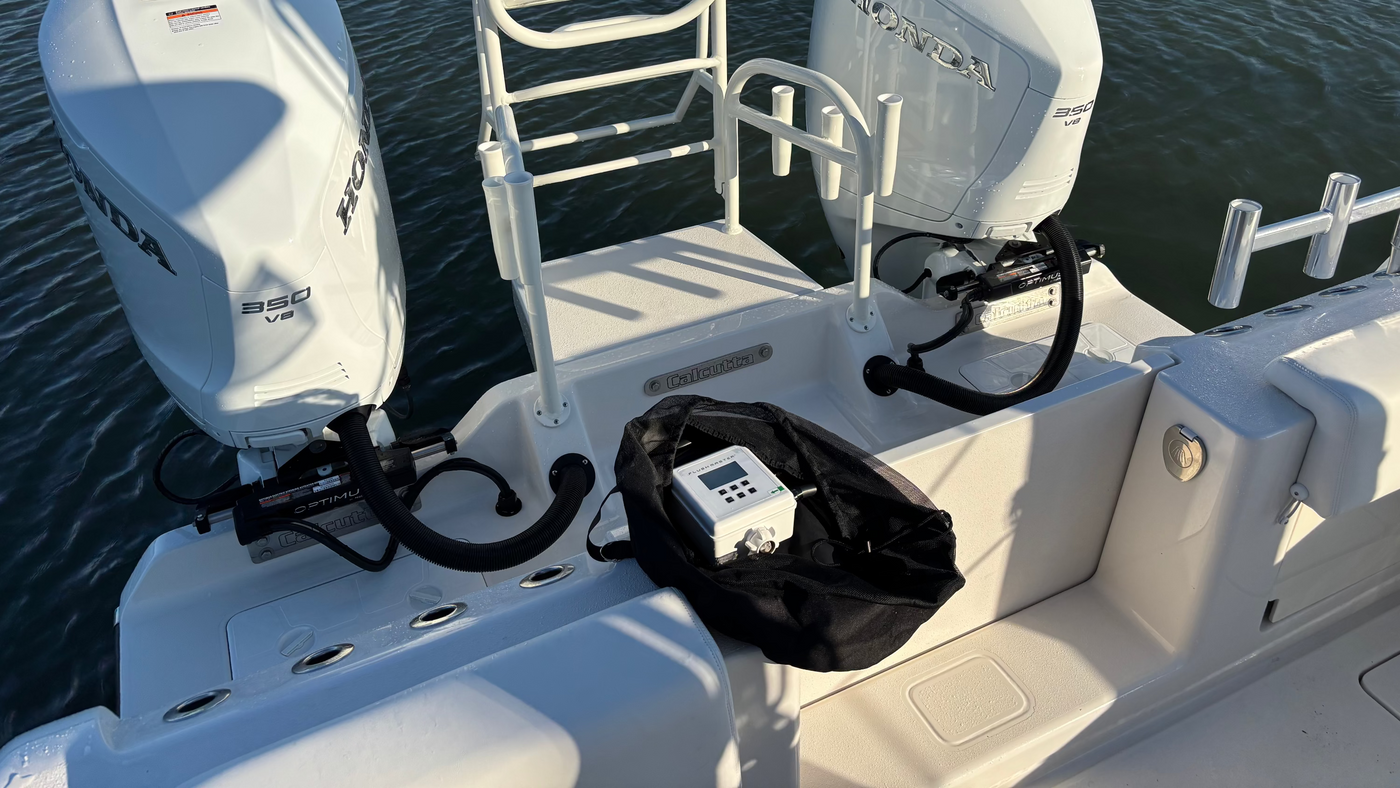
Shown: twin Honda outboards, a portable Controller and a Storage Bag.
Keep the flushing routine with you when your boating location changes.

01

SEDIMENT

Sand, mud & silt

Shallow water, muddy ramps and disturbed bottom sediment can introduce particles into the cooling system. Flushing with clean water helps carry loose material out instead of leaving it inside.

02

WATER QUALITY

Algae, debris & pollutants

Organic debris and impurities can accompany the water drawn into an outboard. Follow the manufacturer’s flushing guidance after dirty or polluted water, and inspect the external cooling-water intakes for visible obstruction.

03

INVASIVE SPECIES

Unwanted passengers

Retained water can help move aquatic invasive species between waterways. Engine flushing belongs in a broader boat-cleaning routine, particularly before traveling to a different lake or river.

PROTECT THE NEXT WATERWAY

Clean. Drain. Dry. Beyond the engine.

A normal freshwater flush is not proof that an engine or boat is free of invasive species. Follow local inspection and decontamination requirements, along with engine-safe procedures.

CLEAN

Remove what you can see

Clean plants, mud and attached material from the boat, trailer and gear before leaving the access area. Look beyond the hull: anchors, ropes and other equipment can carry material too.

DRAIN

Empty retained water

Drain the motor, bilge, livewells and other water-holding spaces according to equipment instructions and local rules. Do not transfer untreated water or unwanted bait to another waterway.

DRY

Allow proper drying

Dry the boat and equipment before moving between waterways. Follow local guidance for the required drying period, inspections and any additional decontamination.

BUILD AN AFTER-TRIP HABIT

A practical outboard flushing checklist.

Keep the engine manual and your Flushmaster product instructions together. One defines the engine procedure; the other explains your connection or control equipment.

01 · PREPARE

Confirm the method

Identify the approved connection, engine position, engine state, supply requirements and duration. Inspect hoses and fittings, clear visible debris from intakes and use a clean freshwater source.

02 · FLUSH

Supply the full cycle

Connect as instructed. Confirm the required water supply and flushing operation, then allow each engine its complete cycle. Keep track of which engines have finished.

If using a running-engine method, follow all operating precautions and never leave it unattended.

03 · FINISH

Restore & inspect

Follow the required shutdown order. Disconnect the supply, restore flush-port connections and caps, and check for leaks or damage. Drain and stow equipment as instructed before the next trip.

MAKE THE CORRECT ROUTINE EASIER

Choose the upgrade that solves your daily frustration.

Better access, simpler hookup and automatic timing help you follow through on the engine’s maintenance routine. Start with compatible engine connections, then add the convenience you need.

Flush Port Quick Connects

EASIER HOOKUP

Engine Quick Connects

Make the existing flush-port connection easier to attach and detach. Choose the fitting approved for your engine; a Quick Connect does not change its flushing requirements.

Explore Quick Connects
Flush Port Reroutes

BETTER ACCESS

Flush Port Reroutes

Bring hard-to-reach connections to an accessible plate, with a separate route for each engine. The Reroute Install Kit is sold separately when needed for installation.

Explore Reroutes
Labeled 4-Outlet Flushmaster Controller showing the inlet, outlets and controls

AUTOMATIC TIMING

Flushmaster Controllers

Supply one selected engine at a time, advance through the sequence and shut off automatically. Choose the Controller for your engine count and set the duration to meet your engine’s instructions.

Compare Controllers

Build your flushing system.

Choose your engine connection and the right Controller for your setup. Confirm fitment before ordering.

Build Your System

COMMON OUTBOARD FLUSHING QUESTIONS

Know what your flushing setup does.

Do I need flush muffs if my outboard has a flush port?

Not for routine flushing when the manufacturer approves the built-in port for that task. Muffs or another approved method can still be needed for procedures that require a running engine. The port is not permission to run the engine on that connection. See Yamaha’s method comparison.

Does an engine-off flush work if the thermostat stays closed?

For Yamaha’s approved built-in-port procedure, Yamaha reports that water still passes into the cylinder-head passages with the engine off, even though the thermostat does not open. That supports using the approved port procedure; it is not a finding about every engine design. Read Yamaha’s explanation.

Is 15 minutes enough for every outboard?

There is no universal time for every model and method. Yamaha’s general guidance gives 15 minutes, while Mercury’s Quick Tip gives 10. Your exact model’s manual takes priority. A longer timer does not compensate for inadequate supply or an incorrect connection.

Can I flush all my engines at once?

Only if the installation and supply meet the requirements of every engine being flushed. A splitter shares the available source and may leave too little flow at individual engines. Sequential flushing avoids that simultaneous demand, but still needs an adequate water supply.

Can Flushmaster products be used with every smaller outboard?

No. Engine size or the presence of a flush port does not establish compatibility. Check the listed brand, model, year and connection for the product. If your engine is not supported, use the manufacturer’s approved flushing equipment and procedure.

Does flushing replace corrosion service or invasive-species decontamination?

No. It is one maintenance step. Existing corrosion, blocked passages and damaged components may require service. Invasive-species prevention also includes cleaning, draining, drying and any locally required inspection or decontamination.